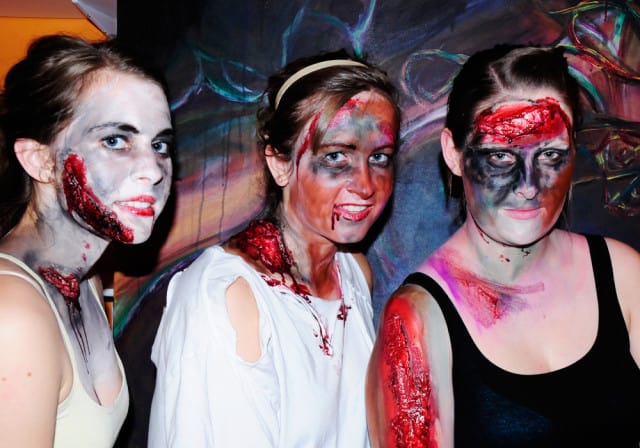
Oct. 31 is the night of the living dead. You might consider dressing up as something cute, funny or witty, but let’s face it, Halloween is supposed to be about scaring loved ones and strangers with outrageous tricks and outfits.
Zombie costumes are classic, cheap and effective, and the Sheaf wants to help you out. Here’s a simplified version of how they make zombie costumes in the movies.
What you’ll need:
You can pick up all of the above items at one of the many seasonal Halloween shops in Saskatoon. (To help you save money, we’ve included a recipe to make your own fake blood below.)
You can make a basic zombie look without the purple, brown and green but these colours work well for adding fake bruises.
Before applying makeup, put on and tear up your zombie clothes. Choose old clothes in light colours to make blood stains and dirt stand out. Rip the clothing or age it with heavily textured sandpaper. If your zombie outfit is a dark color use flour to make clothing appear dirty.
Apply fake blood and dirt generously.
Start off by wetting a makeup sponge and applying a white makeup to use as your base to the sponge. Wetting the sponge will prevent the makeup from streaking. Spread the makeup in an even layer along exposed skin. This will make your zombie appear paler so other colours will be more vibrant. Plus it will make the latex easier to take off once it dries.
Test a small patch of skin about the size of a dime with liquid latex. Remove the latex after fifteen minutes to make sure there is no sign of an allergic reaction.
Avoid applying latex to areas with facial hair as it will be extremely painful to remove.
If there is no allergic reaction to the latex, attach crumpled tissue paper to the skin by covering the tissue with latex using a small paintbrush. This will create believable open gashes and flesh wounds. You can place Rice Krispies or cotton to the inside of the wound to add more texture with additional latex.
Paint dark makeup around the eyes, contour the cheek bones and apply generously around latex flesh wounds.
Add bruises by blending purple, green and hints of brown makeup on the skin with a damp makeup sponge. Don’t be heavy-handed with the makeup as it will be harder to blend. Try dabbing instead of dragging. Layer these colours until satisfied with the results. Place bruises on to the temple, neck, wrists and open areas of skin exposed by ripped clothing.
Once these steps are completed apply fake blood to the wounds with a small brush. Be generous.
Additional fake blood can be added to the hairline, lips, open gashes in clothing, nailbeds and hair. The blood will be extremely sticky.

The infection has spread to the subject’s friends. Quick! Blast their brains out, it’s the only way.
There are two good ways to style a zombie’s hair. If your hair is shorter, you can slick it up using olive oil and fake blood. This will make your hair appear greasy and will create the illusion of gushing head wounds. (Olive oil is a great conditioning treatment, so don’t hesitate to use it.)
For longer hair, break out your back comb. Hold sections up and run your brush towards your scalp multiple times in order to create a knotted, textured look. You can choose to add oil or fake blood for additional zombie cred with this style.
[box type=”alert” icon=”none”]Ingredients:
Instructions:
—
Photos: Jenna Mann/The Sheaf
Leave a Reply